How to replace radiator valves
Radiator valves regulate the flow of water from your boiler to your radiator. When they are faulty, they can cause problems with your heating in that area and perhaps throughout the rest of your system.
If you’re unsure how to replace a radiator valve, this article will walk you through each stage. Read on to find out whether it’s broken, defective, or needs to be replaced with a new thermostatic valve.
What exactly are the two valves on a radiator used for?
Radiator valves are used to regulate temperature, working similarly to faucet handles in that they control the amount of water fed into the radiator. You’ll generally have two valves: a “control valve” that controls the flow of water going into the radiator by restricting it, and a “lockshield valve” to balance your system by regulating heat
How to recognize a malfunctioning radiator valve
There are a few warning signals that a radiator valve may be faulty:
- Jammed radiator valve
- A dripping radiator valve
- Your heater isn’t working properly – it might be cold in some places or all over.
- Twisting the radiator’s lower valves has no impact on how much heat it releases.
If your radiator isn’t heating up as quickly as it should, or if it has cold spots, first verify that it needs to be bled. Check out our easy bleeding radiators how-to guide to learn how to bleed radiators, then check your radiator again. If everything is fine, a radiator valve replacement is not required.
How does a radiator valve work?
If you’ve done all of the steps for bleeding a radiator and it’s still not working, and all of your other radiators are functioning properly, it’s time to address the radiator valve.
If you have a shut-off valve on your hot water heater, follow the instructions in the manual. If not, adjust it as needed to meet your requirements and local code restrictions. The procedure for this depends on the type of radiator valve you have.
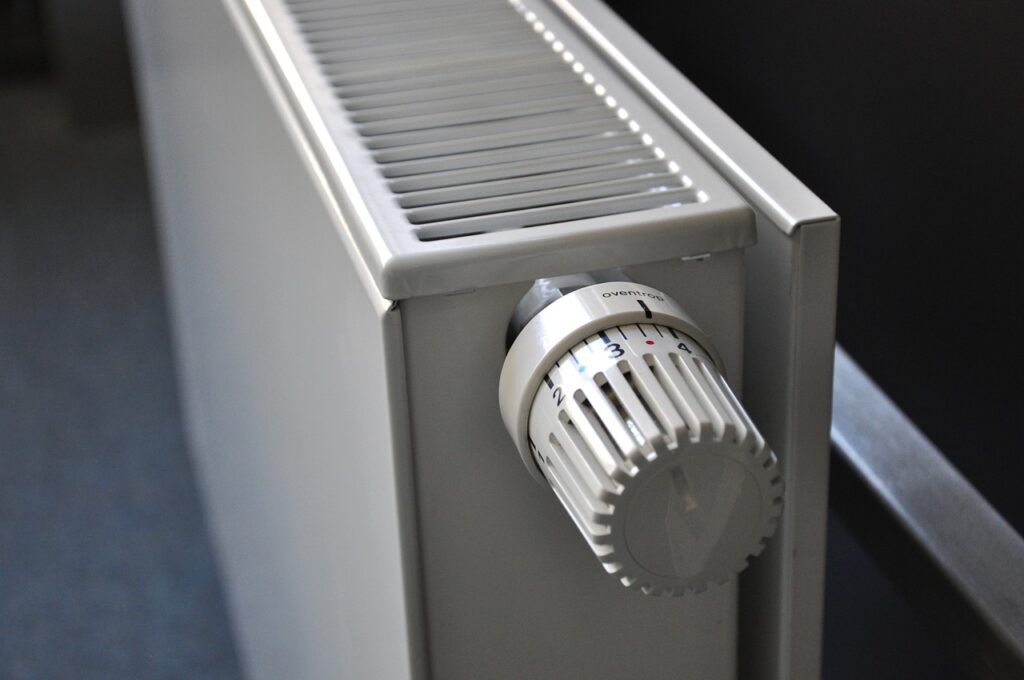
- Thermostatic radiator valve (TRV)
- A TRV is a device that controls the temperature of your radiators. It has a dial with settings ranging from ‘*’ (off) to 1 (about 10°C) to 5 (about 23°C).
- Manual valve
- This is a less sophisticated form of the modern TRV that can commonly be found on older heating systems. It has just two settings: on/open and off/closed.
- Lockshield valve
- The thermostat is in the opposite position from your TRV or manual valve. It has a smaller plastic cap on it that you can remove and use a spanner to open or close the valve. The lockshield valve is rarely needed.
Thermostatic radiator valve (TRV)
Thermostatic Radiator Valves are the perfect solution for heating individual rooms. Because they allow you greater control over room temperatures, you can save money on utilities in areas that aren’t heavily utilized. Thermostatic Radiator Valves automatically adjust the flow of hot water into your radiator according to air temperature, ensuring that it remains at the desired setting
A TRV is composed of two distinct pieces, known as the “head” and “body.” If the temperature drops or rises more than your predetermined setting, a temperature-sensitive capsule within the head of the TRV will expand or compress, pushing in or pulling out a pin in the body of the valve. This allows for either an opening or
The core of the capsules in TRVs is a metal spring that is filled with wax or liquid. Because the liquid is more sensitive to temperature changes, it’s thought of as the most dependable form when changing temperatures. Wax is generally slower, so it’s less expensive.
Jammed radiator valve
The most prevalent issue with TRVs is when the head of the valve sticks or catches, leaving the radiator open or closed. This can happen if the valve hasn’t been adjusted in months – for example, at the end of a hot summer.
Is the pin sticking up out of the body of the valve? If it’s trapped inside the valve or rigid, a spray of WD40 should do the trick. You can also give the valve a light tap around the outside edges, around the pin, with a hammer if it’s stuck in further. If this does not work and the pin is still trapped within the valve body, try tapping on the actual pin gently to dislodge it, after WD40 has been applied.
It’s possible that the pin is working properly but the wax or liquid capsule in the head of the TRV has failed, necessitating a new valve head.
If the hammer won’t pry open a stuck valve, you’ll need to replace it altogether. You’ll also want to drain your heating system if the pin in the valve won’t budge with the hammer.
Leaky thermostatic radiator valve
Plumbers’ tape can be used to seal a leaking TRV (it’s known as PTFE tape by plumbers).
Begin by turning off or closing the other side’s TRV and lockshield valve. The two compression nuts, one on each side of the radiator, are strong suspects for the leak. It is relatively simple to loosen and seal with PTFE tape the olive-shaped compression fitting on the radiator side.
If the insert’s thread is leaking, you may loosen it to expose as much thread as required. Wrap the PTFE tape around the thread in the same direction as when removing it. Then rewind and tighten the nut and olive once again. To check for leaks, open the valves once more.
Manual valve
The temperature is regulated globally by your thermostat with a manual radiator valve. With fewer moving components, these valves are easier to use.
Leaky manual valve
Leaking glands are the most frequent issue with manual valves. The gland is the location where the valve spindle enters the valve body.
The gland packing is compressed around the spindle by the gland nut, which is the highest nut you can see on the spindle. The packing is compressed when this nut is tightened. However, if you tighten it too much, the spindle will be difficult to turn.
The manual valve’s gland nut may have a previous hard-sealing and internally sealed ‘O’ ring. The gland nut on these valves has no visible thread. When the ‘O’ ring wears down, the valve will leak. If this type of valve leaks, closing it entirely or completely opening it might temporarily stop the leak, but the valve
It’s possible to replace the ‘O’ ring, but removing the gland nut completely is not for the faint-of-heart; on some valves, the spindle may come straight out with a lot of filthy water, so keep towels handy.
Lockshield valve
The lockshield valve is usually encased in a plastic cap that reads “lockshield,” which protects it from being inadvertently altered or banged.
The cap is removed, and the top of the spindle can be seen. You may turn the top of the spindle with a spanner to adjust the amount of water passing through the radiator. The spindle can be flat, square-shaped, or even a half-moon shape.
When you’re balancing your radiators in different rooms of your home, for example, adjusting each radiator until it’s heating at the same rate as the others, you usually just need to adjust the lockshield valve. The lockshield valve is the last barrier standing between you and a furious shower! If your shower isn’t as hot as it should be, check your water pressure.
What do I need to replace a damaged radiator valve?
If your radiator valve is beyond repair, you must replace it. Here’s a list of the equipment you’ll need to do so: n
- Your new valve
- An adjustable spanner or spanner set
- PTFE tape (also called plumber’s tape, typically used to seal pipe threads)
- A wrench
- A hose
- A jubilee clip (a circular metal band or strip designed to hold a hose onto a circular pipe)
- Wire wool
- A dry cloth
- Freezing kit (if you aren’t going to drain your system)
- Plus any additional tools
How to replace a radiator valve
It’s not at all difficult to repair your radiator valve yourself without risking flooding if you use a step-by-step approach like the one outlined in this article. Follow our 8-step procedure in the section below carefully.
1. Drain the system
Before you begin any work on your central heating system, it must be drained.
If you have a combi boiler, follow the instructions below; however, if you have a conventional cylinder tank heating system, you’ll need to get help from your local heating Home Expert.
How to Empty a Combi Boiler Heating System:
- Connect the hose to the drain cock and secure it with the jubilee clip, which is typically found at the bottom of the piping.
- Run the hose outside and open the drain cock.
- Wait until all of the water has fled before proceeding to the next step.
You may also isolate your radiator instead if you can’t drain your system (or choose not to):
- Close the valve you’re not disconnecting.
- To prevent water from flowing, wrap the pipe that connects to the valve you’re removing in a freezing kit. Make sure the heating is turned off; it thaws in approximately 15 minutes.
- The water in the radiator should remain trapped as long as you bleed off any extra pressure before you begin and remember to close the bleed valve afterward.
- Attach a valve clamp (or bung) to the exposed end to keep the water in while you remove the valve.
2. Remove the old valve
- In order to catch any water that may be remaining in the system, place the dry cloth beneath the valves.
- Remove the valve from the end of the pipe by unscrewing the cap-nuts and removing them with an adjustable spanner.
- Use wire wool to clean the region around the valve.
3. Remove the old adaptor
- Simply unscrew the old adaptor with an adjustable wrench, as shown in the photo above. You may find it simpler to use a hexagonal radiator spanner if you have a specific type of adaptor.
- Remove the old adaptor and clean the area with wire wool to ensure that the new adaptor fits properly.
4. Fit the new adaptor
- Wrap the PTFE tape about the threads 4-5 times.
- Attach the adaptor to the end of the radiator and tighten with a wrench.
5. Fit the new valve
- Attach the replacement valve by sliding the valve cap-nut and sealing components over the end of the pipe.
- Align the valve with the adaptor using the wrench, then tighten the cap-nut that secures them together.
- Make certain the cap-nut, which secures the valve to the water pipe, is also tight.
6. Refill the system
- Locate the filling loop, which is generally located beneath your boiler.
- Turn the valve slightly and raise it until the pressure gauge reads 1.5.
7. Bleed the radiators
Bleeding your radiators is a simple procedure that expels any trapped air and allows hot water to freely flow.
8. Refill the system again
Once you’ve removed the trapped air from the radiators, relatch and turn the filling loop valve back on until the pressure gauge reads 1.5 again.
If you need a valve replaced one of our gas safe registered engineers can help